You’ve pinned 200 kitchen photos. You’ve walked through three showrooms. And somehow, you’re more confused than when you started.
That’s because choosing a kitchen layout isn’t about what looks good in a photo. It’s about how you actually cook, move, and live in the space every single day. Pick the wrong layout, and you’ll feel it every time you make dinner.
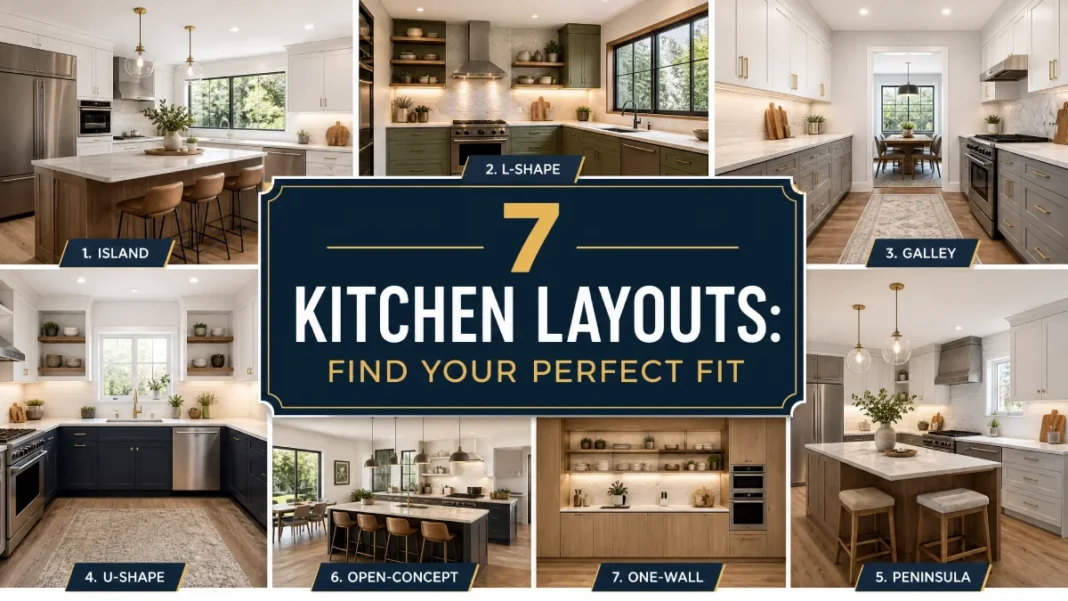
This guide compares seven kitchen layouts using the same criteria for each one: best room size, workflow efficiency, pros and cons, ideal cooking style, appliance placement, cost range, and what it feels like to cook in. By the end, you’ll know exactly which layout fits your kitchen — and your life.
What Is the Work Triangle — and Why It Decides Your Layout
Before you compare layouts, you need to understand one concept that designers use to evaluate every kitchen: the work triangle.
The work triangle connects your three most-used stations — the stove, sink, and refrigerator. In an efficient kitchen, these three points form a triangle with each side measuring between four and nine feet and a total perimeter of 13 to 26 feet — guidelines established by the National Kitchen and Bath Association (NKBA).
Why does this matter? Because the work triangle determines how many steps you take while cooking. A well-designed triangle keeps you moving smoothly between tasks. A broken triangle — where the fridge sits too far from the stove, or the sink blocks the path — adds frustration to every meal.
Some designers also use a five-zone model — storage, cleaning, prep, cooking, and landing — to refine the triangle further, especially in larger kitchens. Each layout below creates a different triangle shape. Some stay tight and efficient. Others are spacious but require more walking. As you read, pay attention to how each layout handles this triangle. It’s the single biggest factor in day-to-day usability.
1. L-Shape Kitchen Layout
The L-shape kitchen uses two adjoining walls that form a right angle, creating a natural corner workspace. It’s the most popular kitchen layout in American homes.
Best kitchen size: This layout works well in rooms from 100 to 200 square feet. You need at least two adjacent walls, each at least eight feet long, to fit standard cabinetry and countertops.
Work triangle analysis: The L-shape creates an open, flexible triangle. You typically place the sink at one end of one leg and the stove along the other, with the refrigerator anchoring the corner or sitting at the end of a run. The triangle stays compact — usually 15 to 20 feet in total perimeter — which keeps your steps short.
Pros:
- Open on two sides, so traffic flows around the kitchen instead of through it
- Works in both small and medium rooms
- Easy to add a small island or dining table if space allows
Cons:
- Corner cabinets can become dead storage without pull-out organizers
- Limited counter space compared to U-shape or island layouts
- Two cooks may bump elbows on the longer legs
Ideal cooking style: The L-shape is perfect for the everyday family cook. If you make dinner five nights a week, prep school lunches, and want everything within arm’s reach, this layout delivers.
Appliance placement: Put your sink under a window on one leg. Place the stove on the opposite leg, ideally with 18 inches of counter space on each side for prep. The refrigerator works best at the end of the run closest to the kitchen entrance — you grab groceries without walking through the cooking zone.
Cost range: $8,000 to $25,000 for a full renovation, depending on cabinet quality and countertop material (quartz, granite, laminate, or butcher block). The L-shape uses standard cabinetry efficiently, so you won’t pay a premium for custom solutions — though adding lazy Susans or pull-outs costs $200 to $800 per corner.
What it looks like: Picture two runs of cabinetry meeting at a corner, with open floor space creating an easy flow between the kitchen and the next room. There’s a natural work zone in the corner and clear sightlines on the remaining sides.
2. U-Shape Kitchen Layout
The U-shape kitchen wraps cabinetry along three walls, creating a horseshoe of workspace. Serious home cooks love it for the sheer amount of counter and storage space.
This layout shines in rooms from 150 to 250 square feet. You need at least three walls with a minimum width of eight feet each, and at least four to five feet of clearance between opposing counters so the space doesn’t feel like a corridor.
The U-shape offers the tightest, most efficient work triangle of any layout — typically 13 to 17 feet in total perimeter. You can place one station on each wall, keeping everything within a pivot-and-step distance.
Pros:
- Maximum counter space and storage — three full runs of cabinetry
- Highly efficient work triangle with minimal walking
- Natural separation between cooking and socializing zones
Cons:
- Can feel closed off if all three walls are solid
- Needs adequate width between counters; under four feet creates a cramped corridor
- A third person in the kitchen struggles to find space
Ideal cooking style: The U-shape is built for the serious home cook or baker. If you roll out dough, juggle multiple burners, and need dedicated zones for prep, cooking, and plating, the three-wall setup gives you room to spread out.
Appliance placement: Follow the classic three-wall division: sink on the longest wall (often under a window), stove on one side wall with a ventilation hood above, and refrigerator on the other side wall. Keep at least 15 inches of counter between the stove and sink for landing space.
Cost range: $12,000 to $35,000. The three-wall configuration means more cabinetry, more countertop material, and potentially more plumbing and electrical work. Custom corner solutions add cost, but you gain significant storage volume.
What it looks like: Three walls of floor-to-ceiling cabinetry wrapped around you like a cocoon of workspace. The open end faces the room, giving you a defined cooking zone with everything within arm’s reach.
3. Galley Kitchen Layout
The galley kitchen — also called a corridor kitchen — features two parallel runs of cabinetry facing each other with a walkway in between. It’s the layout most professional restaurant kitchens use.
This layout works in narrow rooms from 80 to 150 square feet. You need two parallel walls that are each at least eight feet long, with a walkway of four to five feet between them. Anything under four feet of clearance makes the space hard to navigate.
The galley creates a highly efficient linear triangle — typically 13 to 16 feet in total perimeter. With stations on opposite walls, you simply turn 180 degrees to move between the stove, sink, and fridge. Professional chefs prefer this layout because it minimizes wasted movement.
Pros:
- Most space-efficient layout — no wasted corners
- Extremely short work triangle distances
- Cost-effective with fewer cabinetry runs and less material
Cons:
- Only one cook fits comfortably in most galleys
- Can feel enclosed if there’s no natural light or opening at one end
- Traffic through the corridor interrupts the cooking flow
Ideal cooking style: The galley suits the minimalist cook who values efficiency above all else. If you cook focused, methodical meals and don’t need a social kitchen, the galley keeps everything within a step or a turn.
Appliance placement: Place the sink and stove on the same wall if possible, with the refrigerator on the opposite wall. This keeps the wet and hot zones together and the cold zone across the aisle. Aim for at least 24 inches of counter on each side of the stove for safety.
Cost range: $6,000 to $18,000. The galley uses the least cabinetry of any layout, which keeps costs down. The main expense is usually countertops and backsplash material. This is often the most budget-friendly renovation option.
What it looks like: Two walls of cabinets facing each other across a narrow, efficient corridor. Think of it as a cooking lane — everything at your fingertips, nothing out of reach.
4. Kitchen Island Layout
The island layout adds a freestanding or built-in island to an existing layout — most commonly an L-shape. The island serves as additional prep space, storage, seating, or all three.
You need at least 200 square feet of total room space, with 42 to 48 inches of clearance on all sides of the island. The island itself typically measures four to seven feet long and two to three feet deep.
Adding an island to an L-shape creates an expanded, flexible triangle — typically 17 to 24 feet in total perimeter. The island can house a secondary sink, a cooktop, or just serve as prep space. The triangle becomes more of a work “zone” than a tight geometric shape, which works well when the island has a dedicated function.
Pros:
- Creates a social hub — the island doubles as a gathering spot
- Adds significant prep and storage space
- Defines the kitchen without closing it off from adjacent rooms
Cons:
- Requires a large room to maintain proper clearances
- Plumbing and electrical to the island add $1,500 to $5,000 in installation costs
- A poorly sized island can bottleneck traffic flow
Ideal cooking style: The island is perfect for the entertainer. If you host dinner parties, cook while chatting with guests, or want your kids doing homework at the island while you prep dinner, this layout makes the kitchen the center of your social life.
Appliance placement: Keep the main stove and sink on the perimeter walls to simplify plumbing and ventilation. The island works best as a dedicated prep station with a secondary sink or butcher block. If you install a cooktop on the island, budget for a ceiling-mounted ventilation hood — downdraft vents handle light cooking but struggle with high-heat searing.
Cost range: $15,000 to $45,000. The island itself (cabinetry, countertop, installation) typically runs $3,000 to $10,000 on top of a base L-shape renovation. Add plumbing, electrical, and a ventilation hood, and the total climbs quickly.
What it looks like: An L-shape kitchen anchored by a central island — a block of workspace that creates a natural gathering point. From above, it looks like an L with a rectangle floating in the open area.
5. Peninsula Kitchen Layout
The peninsula layout is similar to an island, but one end of the extra counter connects to a wall or existing cabinetry. Think of it as an island with one end anchored in place — you get the island experience without needing as much floor space.
This layout works in rooms from 150 to 200 square feet. You need enough space for at least 42 inches of clearance around the open sides of the peninsula. It’s the island’s smaller, more adaptable cousin.
The peninsula extends an L-shape into a modified U-shape, creating a semi-enclosed triangle of 16 to 22 feet. The connected end provides structure while the open end allows traffic to flow. It’s slightly less flexible than a true island but more space-efficient.
Pros:
- Island benefits without requiring a massive kitchen
- Adds seating, prep space, and storage
- Naturally separates the kitchen from the living or dining area
Cons:
- Less walk-around access than a true island
- Can create a pinch point where the peninsula meets the wall
- Only one side works comfortably for seating
Ideal cooking style: The peninsula suits the social family cook — someone who wants to interact with family or guests while cooking but doesn’t have the square footage for a full island. It’s a practical middle ground between an L-shape and an island layout.
Appliance placement: Keep the main stove and sink on the perimeter walls. Use the peninsula as a breakfast bar or prep surface. If you install a small prep sink on the peninsula, place it toward the open end to keep the workspace accessible.
Cost range: $10,000 to $30,000. The peninsula costs less than a full island because it connects to existing cabinetry on one end, saving on base cabinet materials and installation. Countertop material is the main cost variable.
What it looks like: An L-shaped kitchen with a long counter extending from one end, creating a bar-like divider between the kitchen and the next room. One side faces the cook; the other faces the living space.
6. One-Wall Kitchen Layout
The one-wall kitchen — also called a single-line or straight kitchen — places all cabinets, appliances, and countertops along a single wall. It’s the most compact layout available.
This layout works in spaces as small as 60 to 100 square feet — think studio apartments, ADUs, or open-plan areas where the kitchen is a zone rather than a room. You need a wall that’s at least eight to 12 feet long to fit sink, stove, and refrigerator in a functional sequence.
The one-wall layout creates a linear, flat triangle — technically more of a line, with a total span of 10 to 16 feet. All stations sit along one plane. The workflow is sequential: you move left to right through prep, cooking, and cleanup zones. It’s efficient in a straight line but offers no spatial separation between tasks.
Pros:
- Works in the smallest spaces
- Simple and budget-friendly to build
- Leaves the rest of the room open for living, dining, or other uses
Cons:
- Limited counter space — every inch matters
- No buffer between cooking and social zones (smoke, noise, and smells travel)
- Only one cook can work comfortably
Ideal cooking style: The one-wall fits the minimalist or small-space cook. If you prepare simple meals, use a handful of appliances, and value open floor space over kitchen square footage, this layout works.
Appliance placement: Arrange in this sequence for the best workflow: refrigerator on one end, sink in the middle, stove on the other end. This mirrors how you actually cook — retrieve food, wash and prep, then cook. Keep at least 24 inches of counter between each appliance.
Cost range: $4,000 to $15,000. This is the most affordable layout to renovate — one wall of cabinetry, one run of countertops, and simplified plumbing and electrical. The main cost driver is countertop material.
What it looks like: A single, uninterrupted stretch of cabinetry along one wall — clean, linear, and uncluttered. The rest of the room stays completely open.
7. Open Plan Kitchen Layout
The open plan kitchen removes walls between the kitchen, dining, and living areas, creating one large, connected space. The kitchen exists as a zone within a bigger room rather than a separate enclosed space.
This layout typically involves a combined living-kitchen area of 300 square feet or more. The kitchen zone itself usually occupies 100 to 200 square feet within the larger space, often configured as an L-shape or island setup.
The open plan uses the triangle of whichever base layout it adopts — usually an L-shape or island configuration with a perimeter of 17 to 24 feet. The key difference is psychological: with no walls blocking sightlines, the kitchen feels less confined even when the triangle measures the same as an enclosed layout.
Pros:
- Creates a spacious, airy feel that modern buyers love
- Allows the cook to interact with family and guests
- Increases natural light throughout the space
- Boosts resale value — open layouts remain the most requested feature in home sales, according to the National Association of Realtors
Cons:
- Kitchen smells, noise, and mess are visible from the living area
- Requires a tidy kitchen at all times — there’s nowhere to hide
- Removing walls can cost $2,000 to $8,000 if they’re load-bearing, and you’ll likely need a structural engineer and building permit
Ideal cooking style: The open plan suits the entertainer and social cook — someone who sees cooking as part of the social experience, not a separate chore. If you host regularly, have kids moving between rooms, or love the feeling of wide-open space, the open plan delivers.
Appliance placement: Use an L-shape or island as your base configuration within the open space. Position the stove on a wall with a ventilation hood — even in open plans, proper venting is non-negotiable. Place the sink on the island or peninsula so the cook faces the living area. Keep the refrigerator near the room’s entrance for easy grocery access.
Cost range: $15,000 to $50,000+. The range depends on whether you need to remove walls, reroute plumbing, or add structural supports. If you’re working with an already-open floor plan, costs align with the base layout. If you’re opening up a closed kitchen, demolition and structural work drive the budget higher.
What it looks like: A kitchen that flows into the living and dining areas without walls or doors. Cabinetry defines the cooking zone, while a large island or peninsula acts as the boundary between “kitchen” and “everything else.”
Which Kitchen Layout Matches Your Cooking Style?
Use this quick match to narrow your options:
- You’re a Baker → Try a U-Shape Kitchen. You need maximum counter space for rolling, kneading, and cooling. The three-wall setup gives you dedicated zones for each stage of the process.
- You’re an Entertainer → Try an Island or Open Plan Kitchen. You want guests gathered around while you cook. The island creates a natural social hub; the open plan keeps everyone connected across the room.
- You’re a Family Cook → Try an L-Shape Kitchen. You need efficiency without complexity. The L-shape handles weeknight dinners, school lunches, and Saturday pancake mornings with equal ease.
- You’re a Minimalist → Try a Galley or One-Wall Kitchen. You want everything within reach and zero wasted space. The galley delivers professional-grade efficiency; the one-wall keeps your room open and airy.
- You’re a Social Family Cook → Try a Peninsula Kitchen. You want the island experience without the island footprint. The peninsula lets you interact with the family zone while keeping the kitchen fully functional.
7 Kitchen Layouts at a Glance
| Layout | Best Room Size | Work Triangle | Ideal Cooking Style | Cost Range |
|---|---|---|---|---|
| L-Shape | 100–200 sq ft | 15–20 ft | Family cook | $8K–$25K |
| U-Shape | 150–250 sq ft | 13–17 ft | Baker / Serious cook | $12K–$35K |
| Galley | 80–150 sq ft | 13–16 ft | Minimalist | $6K–$18K |
| Island | 200+ sq ft | 17–24 ft | Entertainer | $15K–$45K |
| Peninsula | 150–200 sq ft | 16–22 ft | Social family cook | $10K–$30K |
| One-Wall | 60–100 sq ft | 10–16 ft | Minimalist / Small space | $4K–$15K |
| Open Plan | 300+ sq ft | 17–24 ft | Entertainer / Social cook | $15K–$50K+ |
How to Choose the Right Kitchen Layout for Your Home?
You’ve seen the layouts, matched your cooking style, and reviewed the costs. Now here’s how to make the final call.
1. Start with your room
Measure your kitchen space. If it’s under 100 square feet, your realistic options are a galley, one-wall, or a compact L-shape. Anything over 200 square feet opens up islands, peninsulas, and open plans.
2. Match it to your cooking style
The quiz above gives you a starting point. But think beyond how you cook today — consider where you’ll be in five years. Growing family? The L-shape or peninsula scales well. Downsizing? The galley or one-wall keeps things manageable.
3. Set your budget early
A galley renovation can cost as little as $6,000, while an open-plan transformation can exceed $50,000. Know your number before you fall in love with a layout you can’t afford.
4. Test the work triangle yourself
Once you’ve chosen a layout, tape it out on your floor with painter’s tape. Walk through your actual cooking routine — where do you stand when chopping? How many steps to the sink? Does the refrigerator door block the walkway? This five-minute test catches problems that blueprints miss.
5. Talk to a kitchen designer
A one-time consultation with a certified kitchen designer (CKD) ($100 to $300) can save you thousands in mistakes. Most designers can review your layout choice and flag plumbing, electrical, or ventilation issues in under an hour.
Conclusion
The right kitchen layout isn’t the one that looks best in a magazine — it’s the one that matches how you cook, move, and live every day. The L-shape handles everyday family cooking. The U-shape gives bakers room to work. The galley and one-wall maximize efficiency in tight quarters. The island and open plan turn cooking into a social event.
Before you commit, measure your space, set your budget, and use the quiz above to narrow your shortlist. Then tape the layout on your floor and walk through a real cooking session. Your feet will tell you more than any photo ever could.
Found this comparison useful? Share it with anyone planning a kitchen renovation, and drop a comment below telling us which layout you chose — and why.

